Posts in Category: Tools
New Chisel Roll
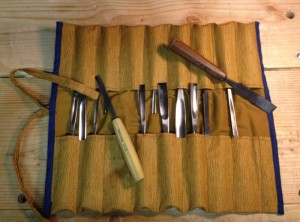
My wife just made me a new chisel roll as a prototype to test out. She’s considering making them available for sale down the road, but she wanted to make me one to see how it worked out. She even made it in this cool “wood grain” fabric that she found, which is kind of neat. Sure beats plain old canvas!
It fits quite a few chisels (my entire set of carving chisels), and has some room for more. In practice I think we’re considering removing some of the space between the two sides, to make it a little safer to get chisels out, but I’d be happy to throw this in my toolbox and take it somewhere like Port Townsend for a woodworking class or something.
The chisels are secure when rolled up because the blades pinch together in the middle when tied up, and makes it very unlikely for them to slip out. Plus putting them in handle first helps you know what chisel to grab, prevents the very sharp blades from tearing up the bottom of the pocket.
She was curious if anyone would be interested in these (with different fabric probably, but she has enough to make at least one more). So if you’re interested, please send me a note and we can chat.
Badger
Tuning up a Dado Plane
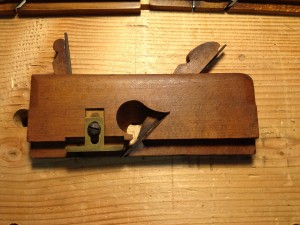
A while back I picked up a set of three Dado planes, one of which was 3/4″ in good shape from the ever amazing tool seller Hyperkitten. Of course that’s the really useful size in our modern day lumber world. I hadn’t spent the time to tune it up to working condition, so this afternoon was a good time. I needed to make some grooves in the case for the drawer supports. I could easily do it with my carcase saw and some chisel work but I’ve been wanting to try this plane out.
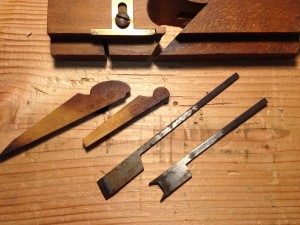
I started out taking it apart to check the steel of the blades, and nickers which turned out to be in rather good shape. I wire brushed it a little to clear some bulk of the crud off, and they both looked quite decent although the long part of the nicker had a bend in it. The plane body was solid, no checks or warping.
I started out on a Medium India stone on the blade, and worked through to Translucent and finally stopping all by hand. I was a bit worried that the nickers would be problematic, but after propping my stones up on the case I was able to get to the inside edge (never the outside edge if you can avoid it, you don’t want to make the over all width go down.)  As I worked the inside slowly I was having problems keeping it steady, and on closer inspection the last guy to sharpen it had the same problem. It was rounded a bit, but the points where sharp so I figured it would be good enough which turned out to be correct. I tweaked the slight bend in the top part of the nicker, and re-assembled it.
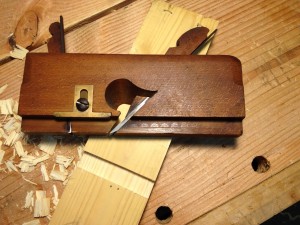
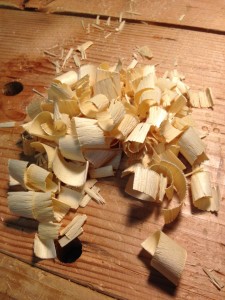
I tested it out on a scrap piece of pine, and it worked fantastic. I used a fence clamped to the board as a guide, and set the depth stop by eye. The sides of the trough were square, and the bottom was smooth enough. It took very little effort to use, and is now my new favorite way to make dados! I put it right to use on the sides of my dovetailed three drawer carcase project. The prototype is in Pine, and check out the cross grain shavings I was getting with the dado.
All in all, I’m VERY pleased with this plane. Thanks Josh! (If you’re in the market for old user tools, follow his blog for excellent deals. He has never steered me wrong, and he finds great tools. Highly recommended.)
Badger
Shop Made Turning Bow Saw
A while back I was torn between splurging on a Gramercy Turning saw, or a simple (but quality) coping saw. In the end I compromised, by getting the Olson Coping Saw (no regrets there, great tool) and buying the parts for the Gramercy Turning Saw. Last night I was in a mood, and needed to break out of a funk so I went down with the intention of cleaning the shop, or maybe marking out a box using whole number ratios.
Instead I made a turning saw from the kit.
It went surprisingly quickly, and I was able to put it together in about two hours all told. I used some straight grained oak 1×2 I had picked up at a Home Center, and cut it down to size. Rather than try to rip the length down on such a small piece, I just put it in the vise and planed off the excess to my line with a Jack plane. I used another small bow saw I had picked up at a salvage place (with a terrible blade, so I never use it) as a pattern and went to it.
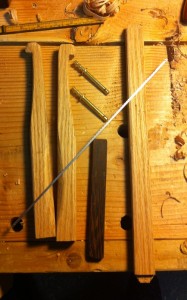
I cut the arms to length, and traced the outline of the existing bow saw onto the wood. I cut out the head shape, and the curve with my coping saw and chisels. I then used my spokeshaves from Lee Valley to smooth out the rough spots and a some rasps to smooth the head a bit. I need better rasps I have decided, but that’s for later. I drilled the hole in each arm with a eggbeater drill, and while they were a bit off center I don’t think it will matter much in practice.
Inserting the pins into the arms, and slotting the blade in, I measured the distance between the arms, and used that for the cross bar length (adding a little for the small tenons).
This was my first time cutting a mortise and tenon in a really long time, so I took it slow but it thankfully went together pretty quickly. I used a 1/4″ Narex mortise chisel to carve the trench (after a quick honing) and after a little fumbling I got the movements down pretty quickly. Then I cut a small tenon on each end of the cross bar to fit each side, and cut the corners of the tenon to allow it to move a little side to side as the frame is tightened and loosened. If it was left square it could cause issues as it tightened.
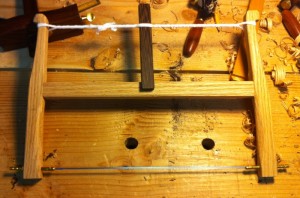
Once this was all fitted together, I grabbed a scrap piece of Wenge and some string that I will replace later with some tough twine, and tightened it up. I was able to get good tension, and it held together really well. I took it back apart, and shaped the hand hold area with the spoke shaves and made sure all of the edges were rounded.
Next step will be to glue up some blocks onto the brass pins, and turn a couple of nice knobs. Right now my lathe is buried under the wood for my new work bench, but it will work like this for now if I need to do any fret sawing .
All in all I’m pleased with this project, and how quickly it came together. I would highly recommend the kit to anyone who needs it. As always Gramercy Tools are top quality.
Badger
Check out Blue Spruce
I went to the Lie Nielson Hand Tool event today to check out their latest offerings, and bask in the glow of expensive but totally worth it tools. They had a couple of other guest exhibitors including Blue Spruce Toolworks out of Oregon. I’ve admired his work from afar (i.e. the internet) but to see the tools up close and personal is hard to describe. All of his work is absolutely top notch, functionally as well as aesthetically. His chisels area amazing, his marking knives sublime. And to top it all off, Dave is a really nice guy who knows his craft.
I picked out a nice Cocobolo marking knife for myself, for my upcoming birthday. It was a bit of splurge, but it’s a really nice tool. It will make the marking of dovetail pins a lot easier for sure, plus it’s quite a nice looking tool as well.
I heartily recommend checking out his wares.
Badger
Sharpening up some carving chisels
I needed a break from a four year old who was testing his limits a little, and went down to the shop to sharpen some chisels. Now, I know that SOUNDS like a bad idea, and it probably was.
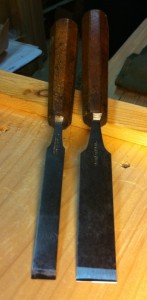
I’ve been wanting to modify the profile of these old chisels I picked up a while back to be more like the flat carving chisels I have in use already. I picked them up in the early phase of my tool acquisition period, which means I bought a bunch of stuff whenever I found it not always buying something I might need or want. These were picked up in a bundle, hoping to be paring chisels but look a bit more like carving chisels because of the way the tang enters the handle.
Regardless, I have good chisels now, and these needed to find a new life. They worked OK with a single bevel when I needed to outline a carved design or something, but I thought they could use a good sharpening and the one small flat carving chisel I have was a double bevel.
First I set the angle by eye on the tool rest on my grinder, and added the bevel roughly to what I wanted with a slow speed white wheel I use for sharpening my turning tools.
Then I pulled out the oil stones and put them through the grits free hand.
I started with the Coarse India from Norton, and worked the roughness off the grinder and adjusted the bevel slightly.
Next I used the Medium to refine the edge a little.
A few swipes on the Translucent Arkansas and I was nearly done.
Final step was a few strokes on some leather charged with “green stuff” for a final mirror polish.
I make it sound simple, but this sharpening regimen took me years to figure out, and purchase. I’m really happy with what I can do in a fairly short amount of time with these stones, and I don’t have to bother with water stones. I know most everyone else loves them to death, but I find the mess abhorrent personally. Everyone should find a system they like and stick with it, that’s what I’ve heard and that’s what I also recommend.
In the end I was able to slice paper with these edges, and the cut wood very nicely when used in a “stab cut” to set in an outline. All in all I’m happy. (And I was able to burn off the mood the willful child had caused, without cutting myself. Working in my shop relaxes me so, I need to do it more.)
— Badger
Question about how to start carving…
In response to my post tonight about my carved tool tote, I got a question about how to start carving similar stuff. The answer I thought might be of more general interest, so I thought I’d post my answer here.
“I was reading your blog post about carving your tool tote. I would like to get started doing some really small and simple carvings. Do you have a book/dvd that you recommend and what are a few needed tools to get started?”
The answer kind of depends on what kind of carving you want to do really, but since the question was about the stuff I have been doing I’ll answer in that regard.
DVD
- Peter Follansbee – 17th Century New England Carving
- Peter Follansbee – 17th Century New England Carving: Carving the S-Scroll
http://www.lie-nielsen.com/catalog.php?grp=1320
Scroll down a bit for the first one, it’s the best for starting out. Then follow up with the S-Scroll dvd. Absolutely top notch stuff, and very easy to understand and learn from.
Blog
Reading Peter’s blog: http://pfollansbee.wordpress.com/ from start to finish. :) That is if you are a geek about history and woodworking like me. Otherwise search on carving.
Books
Tools
I posted a while back about my starter set of tools, based on the recommendations of Peter Follansbee and his basic kit.
https://badgerwoodworks.com/2010/12/peters-carving-tools-interpreted/
this has the list of Tools I started with and how I got the list.
- Pfeil Gouge #9/10 mm
- Pfeil Gouge #6/20 mm
- Pfeil Gouge #8/13 mm
- Pfeil Gouge #8/20 mm
- Pfeil Gouge #5/12 mm
- Pfeil V-Parting Tool #12 8mm
I did about 4-5 fully carved pieces with that set before I started expanding. I’ve added about half dozen chisels so far, but only as I need them for specific projects. The set above is a decent starting place I figure for the kind of carving I do. It’s hard to say specifically what you’ll need since you might have a different design style in mind, but a good V tool and small variety of gouges will be a good as place as any to start.
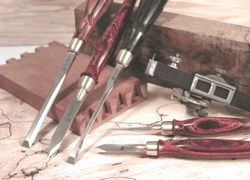
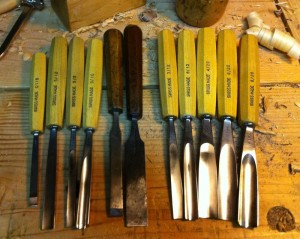
Here is part of my current kit, which I used nearly off of these for the Tool Tote carving.
Hope that helps.
Badger
How much does she love me?
This much apparently.
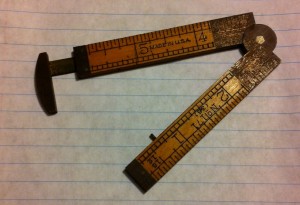
My wife found a little mini folding rule for Valentines day for me. I’m not sure how it happened but I think I am kind of collecting these things now. I’ve seen a few folding rules out there, but nothing this small. I have his 1′ folding cousin that I use in the shop all the time, so I think this one is pretty awesome. Not real useful, but awesome.
Badger
Wretched Coping Saw, Begone!
I’ve been doing a little dovetailing lately, and that means I’m also doing a little bit with the coping saw to clear the waste. Every time I drag that plastic handled demon out of my tool box, I am reminded how much I despise this saw. It’s a struggle to use, it fights me constantly, and is simply a pain the butt to use.
I was reading through bits and pieces of the Anarchists Toolbox again, and came across his diatribe about his first coping saw that he used an example of a poor quality tool. I resolved then and there to do something about my coping saw issue, and set out to do some research into a replacement. I finally settled on the Olson Coping saw from Tools for Working Wood, although the Gramercy bow saw with coping saw blade was a serious close second. It came down to price really, and I sort of compromised by getting the Olson, as well as the blades and pins for building my own frame for the bow/turning saw at some future date.
I gave the Olson a little test run tonight, and it was worlds apart from the plastic handled demon that has vexed me so! I got the Skip Tooth 18 TPI blades on a recommendation and it was a good one. The frame is nice and solid, the handle feels good and the blade cut through walnut like something close to butter.  I’m looking forward to doing more dovetails now, and am glad to be giving my old coping saw the boot.
badger
Oilstone Sharpening Level Up!
Last weekend at the Hand Plane Essentials class that I took from Port Townsend School of Woodworking, we covered sharpening extensively. they devoted half of the second day to the subject. Unfortunately for me they focused on waterstone sharpening to the exclusion of all other methods, except some on the topic of “sand paper on glass”. This was fine though, because Jim’s system of waterstone sharpening was fast and efficient. I was impressed, but I had previously decided to go Oilstone, and had purchased a number of stones already.
I really didn’t want to switch gears mid stream…
Plus, on the advice of Mr. Schwarz I am going to commit to the Oilstones for a while, and see if I can make it work. If you skip around from system to system you’re essentially wasting time and money. I had purchased a set of India stones Coarse, Medium and Fine. I used some of my bonus money to purchase a high quality stone from Tools for Working Wood.   They just recently started offering a 3″ wide Hard Translucent Arkansas stone in a 1/2″ size at a reason able price. I got the stone in the mail today, and it is a fantastic stone! I was blown away by the quality of this stone. I quickly ran down to the shop (with my three year old in tow, since we were hanging out today) to try it out. I set up the kid with a hammer and some nails and set him loose on some scrap lumber.
I took a Stanley #3 plane I had picked up recently, and gave it a quick whirl using the same techniques that I’d learned at Port Townsend last weekend. With in a very short amount of time, I had a sharp blade and was taking shavings of decent quality. I wasn’t really trying for wispy thin shavings or anything, I just wanted to put a decent edge on it for testing out the new stones. I am very stoked to have finally gotten a sharpening system that I think will show results as I build my skills. My attempts on previous stones that I’d picked up were depressing, but now I know it has to do with the quality of the stones I was using. I’d gotten them at a tool show, with no idea of what I was buying. They’ll be good for knife sharpening I’m sure, but not for plane blades. They are too thin (2″ wide stones) for plane blades anyway.
My Oilstone Sharpening/Honing Method
1x Hard Translucent Arkansas Stone
3 in 1 machine oil
The system I learned at the class was really simple.
1. Establish a bevel at 25 degrees
2. Hone a micro bevel at 30 degrees
It really was that simple. The #3 blade was dished in the middle, and it was pretty dull. In the class we used a grinder and the Lee Valley tool rest (which I have on order) to establish the bevel. On one of my blades we put an 8″ radius for a fore plane blade, but the other was straight across. At home I used the medium India stone to re-work the bevel. The coarseness of the India stone worked pretty well, and I went at it free hand for my first test run. I laid the blade down so the existing bevel was flat, and rocked back and forth keeping the bevel flat against the stone. Soon enough, probably 10-20 strokes the bevel was pretty good, although I think I need to spend a little more time on this blade. I wiped the oil from the stone, and moved to the Hard Translucent Arkansas stone. Adding oil to the stone, I found the bevel, and lifted my hands up an inch or so, and began to rock back and forth again for about 10 strokes. I got a decent micro bevel in that short time, and I hit the burr on the back side with the back flat on the stone, raised by a thin metal ruler (the ruler trick).
Since this was just a test, I popped it into the plane, and ran a few passes over a board advancing the blade a little at a time. Right away I got some good shavings coming off the wood. Next time I go down, I’ll spend a little time setting the plane up, and sharpening some more to practice, but I was pleasantly surprised how quickly I got a decent edge from these two stones. I have some green stropping compound to add to a leather piece I am going to glue to a board for the final polish step.
One thing I want to put into practice was something that I was discussing with Tim Lawson at the class in PT. He talked about honing (strop, or high grit stone) just before and right after you work with a blade will make it so that you will have to sharpen very infrequently because the blade never really gets dull. I’m not sure how that will work in practice, but it makes great sense for my carving tools. I want to set up a sharpening station in my shop, so I can just take the lids off the stones, hone, and go back to work.
I’m not one of those guys who will be obsessing over sharpening, I just want to work the wood with sharp tools, and I think this system (with my new stone) will be just what I need.
Ding! Level up! (Gratuitous video game reference!)
Badger
The #4 vs #4 1/2 Smooth Plane Dilemma
Lie-Nielsen Toolworks USA | No. 4 versus Lie-Nielsen Toolworks USA | No. 4 1/2


I got a little bonus at work, and I wanted to drop some on a new plane from LN. Now I can’t decide which #4 version to get…
I have the Low Angle Jack from them already, and a #4 Stanley Type 19 that I’ve tuned up a little.
Any advice? I love the look of the Brass body #4… but if I can only get one plane…
Help?

